Cài đặt OpenLDAP trên CentOS 6 xem bài:
http://nvkhoiit.blogspot.com/2013/10/cai-at-openldap-tren-centos-6.html
Cài đặt LAM và LDAP Admin xem bài:
Sử dụng migrationtools để xây dựng kiến trúc LDAP Server dựa trên thông tin có sẵn của hệ thống Công cụ Migrationtools này là một tập hợp các Perl scripts dùng để chuyển đổi các users, groups, aliases, hosts, netgroups, networks, protocols, RPCs, và services từ existing nameservices (flat files, NIS, và NetInfo) đã có sẵn trong hệ thống tới LDAP.
Lưu ý: Với bản OpenLDAP mới (mình cài version openldap-2.4.23-32.el6_4.x86_64) thì các file migrate_... không có sẵn (thường nằm ở đường dẫn /usr/share/openldap/migration), ta phải cài bộ công cụ migrationtools.
Cài đặt công cụ migrationtools
[root@servermail Desktop]# yum install migrationtools
Công cụ này sẽ cho chúng ta các file:
Files
- /usr/share/doc/migrationtools-47/
- /usr/share/doc/migrationtools-47/README
- /usr/share/doc/migrationtools-47/migration-tools.txt
- /usr/share/migrationtools/
- /usr/share/migrationtools/migrate_aliases.pl
- /usr/share/migrationtools/migrate_all_netinfo_offline.sh
- /usr/share/migrationtools/migrate_all_netinfo_online.sh
- /usr/share/migrationtools/migrate_all_nis_offline.sh
- /usr/share/migrationtools/migrate_all_nis_online.sh
- /usr/share/migrationtools/migrate_all_nisplus_offline.sh
- /usr/share/migrationtools/migrate_all_nisplus_online.sh
- /usr/share/migrationtools/migrate_all_offline.sh
- /usr/share/migrationtools/migrate_all_online.sh
- /usr/share/migrationtools/migrate_automount.pl
- /usr/share/migrationtools/migrate_base.pl
- /usr/share/migrationtools/migrate_common.ph
- /usr/share/migrationtools/migrate_fstab.pl
- /usr/share/migrationtools/migrate_group.pl
- /usr/share/migrationtools/migrate_hosts.pl
- /usr/share/migrationtools/migrate_netgroup.pl
- /usr/share/migrationtools/migrate_netgroup_byhost.pl
- /usr/share/migrationtools/migrate_netgroup_byuser.pl
- /usr/share/migrationtools/migrate_networks.pl
- /usr/share/migrationtools/migrate_passwd.pl
- /usr/share/migrationtools/migrate_profile.pl
- /usr/share/migrationtools/migrate_protocols.pl
- /usr/share/migrationtools/migrate_rpc.pl
- /usr/share/migrationtools/migrate_services.pl
- /usr/share/migrationtools/migrate_slapd_conf.pl
Chuyển về thư mục chứa các công cụ migrationtools
[root@server Desktop]# cd /usr/share/migrationtools/
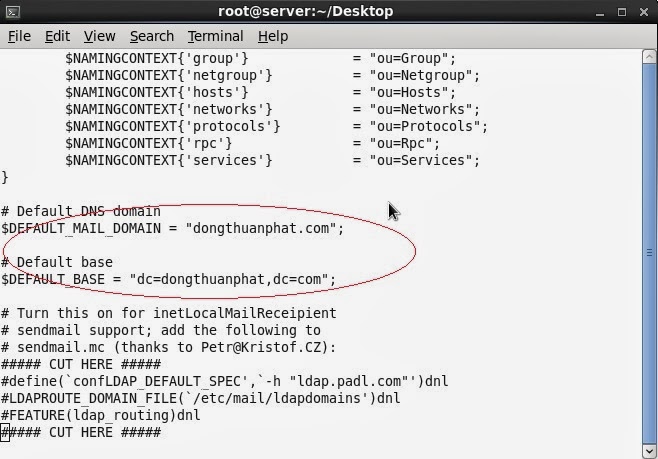
Chỉnh sửa file migrate_common.ph
[root@server migrationtools]#
vi migrate_common.ph
#
Default DNS domain
$DEFAULT_MAIL_DOMAIN
= "dongthuanphat.com";
#
Default base
$DEFAULT_BASE
= "dc=dongthuanphat,dc=com";
Xuất file migrate_base.pl ra file base.ldif trong
thư mục /tmp
[root@server migrationtools]# ./migrate_base.pl >
/tmp/base.ldif

Trên LDAP-Server đưa nội dung file
base.ldif vào kiến trúc của LDAP bằng lệnh ldapadd sau đó kiểm tra kết quả với
lệnh ldapsearch
[root@server migrationtools]# ldapadd
-c -x -D "cn=Manager,dc=dongthuanphat,dc=com" -W -f /tmp/base.ldif
[root@server migrationtools]#
ldapsearch -x -LLL -b "dc=dongthuanphat,dc=com"
"(objectClass=*)"

Trên LDAP-Server chạy script
migrate_passwd.ph để tạo file LDIF chứa danh mục user cho LDAP dựa trên danh
sách các user hiện có trên hệ thống (trong file /etc/passwd). Xem nội dung file LDIF
[root@server migrationtools]# ./migrate_passwd.pl /etc/passwd
> /tmp/allusers.ldif
[root@server migrationtools]# vi /tmp/allusers.ldif
Trên LDAP-Server đưa nội dung file
allusers.ldif vào kiến trúc của LDAP bằng lệnh ldapadd sau đó kiểm tra kết quả
bằng lệnh ldapsearch
[root@server migrationtools]# ldapadd -c -x -D "cn=Manager,dc=dongthuanphat,dc=com"
-W -f /tmp/allusers.ldif
[root@server migrationtools]# ldapsearch -x -LLL -b
"dc=dongthuanphat,dc=com" "(uid=root)"

Trên LDAP-Server tạo một account mới có
tên ldapuser thuộc nhóm users trên hệ thống và đưa account này vào LDAP
# Tạo một user có tên ldapuser, thuộc
nhóm users và đặt password cho user này
[root@server migrationtools]# useradd
-g users ldapuser
[root@server migrationtools]# passwd
ldapuser
# Lấy thông tin về ldapuser từ file
/etc/passwd và ghi ra file /tmp/ldapuser.info
[root@server migrationtools]# grep
"ldapuser" /etc/passwd | tee /tmp/ldapuser.info
ldapuser:x:505:100::/home/ldapuser:/bin/bash
# Dùng script migrate_passwd.pl để tạo
file LDIF từ file /tmp/ldapuser.info
[root@server migrationtools]# ./migrate_passwd.pl
/tmp/ldapuser.info > /tmp/ldapuser.ldif
[root@server migrationtools]# vi
/tmp/ldapuser.ldif
# Đưa thông tin về user ldapuser trong
file ldapuser.ldif vào kiến trúc của LDAP
[root@server migrationtools]# ldapadd
-c -x -D "cn=Manager,dc=dongthuanphat,dc=com" -W -f
/tmp/ldapuser.ldif
# Kiểm tra thông tin về user ldapuser
trong kiến trúc của LDAP
[root@server migrationtools]#
ldapsearch -x -LLL -b "dc=dongthuanphat,dc=com"
"(uid=ldapuser)"

Cấu hình Client để xác thực qua LDAP
Server
IP
ldap server: 192.168.132.128/24

Kiểm tra địa chỉ IP
trên LDAP-CLIENT và ping thử đễn LDAP-Server để kiểm tra kết nối
[root@dns_dhcp Desktop]# ifconfig eth0
[root@dns_dhcp Desktop]# ping
192.168.132.128

Trên máy LDAP-CLIENT kiểm
tra thông tin về account ldapuser để đảm bảo chưa có account này
[root@dns_dhcp Desktop]# finger ldapuser
bash: finger: command not found
Nếu lệnh finger báo
lỗi không có như trên, ta sẽ cài đặt gói finger bằng lệnh:
[root@dns_dhcp
Desktop]# yum install finger
Kiểm tra file
/etc/nsswitch.conf và các file trong thư mục /etc/pam.d/ để thấy việc tìm kiếm
thông tin người dùng ( User Information ) và xác thực người dùng (
Authentication ) chưa được xác thực để sử dụng cho LDAP
[root@dns_dhcp Desktop]# cat
/etc/nsswitch.conf
[root@dns_dhcp Desktop]# grep
"ldap" /etc/pam.d/*

Chạy lệnh
authconfig-tui để mở chương trình Authentication Configuration. Chọn User LDAP
trong mục User Information và chọn User LDAP Authenticaiton trong mục
Authentication như hình dưới và chọn Next
[root@dns_dhcp Desktop]# authconfig-tui

Nếu hiện ra thông báo lỗi

Lỗi này là do ta đang thiều gói cài đặt
nss-pam-ldapd, nhấn OK để tiếp tục và thoát ra, ta sẽ tiến hành cài đặt gói này.
Ta cài đặt gói nss-pam-ldapd bị thiếu
[root@dns_dhcp Desktop]# yum install nss-pam-ldapd
Quá trình cài đặt sẽ diễn
ra, nhấn Y khi được hỏi

Sau khi quá trình cài đặt kết thúc ta
vào lại giao diện thiết lập LDAP Authenticaiton
[root@dns_dhcp Desktop]# authconfig-tui
Nhập thông tin về LDAP Server và Base DN
sau đó chọn OK

Ok, đã thành công

Kiểm tra lại các file /etc/nsswitch.conf
và file /etc/pam.d/system-auth để thấy việc tìm kiếm thông tin người dùng và
xác thực người dùng đã được cấu hình để sử dụng LDAP
[root@dns_dhcp Desktop]# grep
"ldap" /etc/nsswitch.conf
[root@dns_dhcp Desktop]# grep
"ldap" /etc/pam.d/system-auth

Kiểm tra lại thông tin về account
ldapuser. Chú ý rằng thư mục $HOME của ldapuser /home/ldapuser) chưa được tạo sẵn

Cấu hình thêm cho PAM để tự động tạo thự
mục $HOME cho các user khi login lần đầu tiên vào hệ thống
[root@dns_dhcp Desktop]# ls /lib/security |
grep pam_mkhomedir
pam_mkhomedir.so
[root@dns_dhcp Desktop]# vi
/etc/pam.d/system-auth
# Chèn dòng dưới vào cuối cùng của file
session optional pam_mkhomedir.so skel=/etc/skel/ umask=0022
session optional pam_mkhomedir.so skel=/etc/skel/ umask=0022

Chuyển sang một
terminal khác bằng cách nhấn
tổ hợp phím (Ctrl+Alt+F3) và thử login sử dụng
account ldapuser. Kiểm tra để thấy thư mục $HOME của account này đã tự động được
tạo ra trên hệ thống. Chuyển lại giao diện đồ họa bằng tổ hợp phím
(Ctrl+Alt+F1) hoặc (Ctrl+Alt+F7)
dns_dhcp login: ldapuser
Password:
Creating directory ‘/home/ldapuser’
[ldapuser@dns_dhcp ~]$ pwd
/home/ldapuser
[ldapuser@dns_dhcp ~]$
Giờ ta có thể logon bằng tất
cả các user của LDAP
Server và thư mục $HOME của account ta logon sẽ được tự động được tạo
ra trên hệ thống
Lưu ý: Có thể khi logon các User của LDAP Server từ màn hình đăng nhập của LDAP Client sẽ có
báo lỗi không tạo được thư mục trong $HOME(hoặc bất cứ lỗi nào khác), ta cứ nhấn
Close để đóng thông báo, OK nếu được yêu cầu, sau khi logon được ta nhấn tổ hợp
phím (Ctrl+Alt+F3) để vào cửa sổ
terminal đăng nhập, nó sẽ tạo ra được thư mục trong $HOME và khi tạo được thư mục
trong này từ lần sau ta sẽ logon từ màn hình đăng nhập bình thường mà không có
thông báo lỗi nào nữa.
Cảm ơn bạn đã chia sẻ.
Trả lờiXóaBạn cho mình hỏi.
Giả sử mình có 1 windows domain. Mình có thể xây dựng 1 LDAP(Centos) lấy thông tin username,password từ Windows Domain đó không ?
Thanks bạn.
Dear anh Khôi,
Trả lờiXóaCảm ơn bài viết của anh, em đang tham khảo và có 1 vấn đề nhờ anh hỗ trợ giúp:
1. Em đã tạo xong 1 LDAP server như bài viết "Cài đặt OpenLDAP trên CentOS 6"
2. Trên LDAP client em cũng đã cấu hình đủ như anh hướng dẫn, tuy nhiên sau khi cấu hình authconfig-tui thì không cho kết quả như bài viết của anh:
- Nếu tích chọn cả Use LDAP và Use LDAP Authentication thì nssswitch.config sẽ có nội dung:
passwd: files sss
shadow: files sss
group: files sss
services: files sss
netgroup: files sss
=> sss chứ không phải ldap, chạy lệnh finger ldapuser cho ra đúng thông tin
Đồng thời trong /etc/pam.d/system-auth không có nội dung:
auth sufficient pam_ldap.so use_first_pass
account [default=bad success=ok user_unknown=ignore] pam_ldap.so
password sufficient pam_ldap.so use_authtok
session optional pam_ldap.so
=> Khi chuyển sang terminal khác để đăng nhập thử thì luôn bị báo là "login incorrect"
- Nếu bỏ tích chọn USE LDAP thì không thể kiểm tra được thông tin LDAP user qua lệnh finger
Nhờ anh kiểm tra giúp em nhé, em đang dùng CentOS 6.3 và openldap-2.4.23-26.el6.x86_64
Cảm ơn anh nhiều,
Thanh Bình